Mating the Exocet chassis to the Miata drivetrain
Build Guide
Mating the chassis and drivetrain
Joining the Mazda Miata components to the Exomotive Exocet
Alright, here’s the big moment. Your Miata powerplant frame should be stipped down like so:
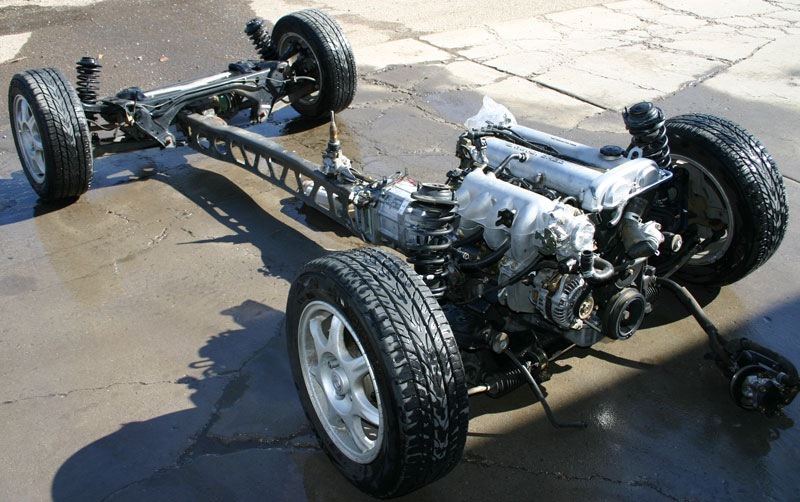
[Image Credit to Flyin’ Miata]
Don’t stress out about this step, it’s very easy and self-explanitory. If you took off your turbo when it was in the Miata tub, you will probably want to install it now. We had plenty of clearance when installing our frame over a full FM2 turbo manifold, turbo, downpipe, and exhaust. You don’t have to center the frame until it’s down on the subframe, so there’s a lot of wiggle room.
Now, grab a helping set of hands, lift the chassis, and place it on the Miata PPF. Depending on the history of your Miata, the condition of your motor mounts, and the completeness of your differential bushings, there may be a minor amount of finangling to get all 12 holes lined up. If you have difficulty getting a bolt in every hole, your front subframe is likely bent. We check our frames after welding with a real Miata front subframe to ensure a perfect fit. A replacement subframe from another Miata or the aftermarket is in order if you cannot force yours to fit.

Alright, congrats, post your pictures to Facebook and GRM, you have an Exocet now. Once you’re done basking in the accomplishment, time to add your bolts. The short (30mm) bolts account for the front subframe’s 6 forward-most mounts. The medium-length (50mm) M12 bolts are for the front subframe’s connection to the floor. The long bolts (80mm) connect the rear subframe to the chassis. The front subframe bolts DO NOT require a washer on the bolt head. Drop the bolt head down into the hole. We find front-to-back is easiest on subframes that have seen a hard life. A ratchet strap can be used to coax a stubborn subframe.
Once you have all the bolts for the front subframe installed, place a washer and then a nut onto the exposed thread. Run up the washers by hand until they are finger-snug. Once they are snug, go around and tighten all the bolts with a ratchet (you will torque them down next). Once they are ratchet-tight, move onto the rear subframe. Install all the bolts, but this time use a washer under both the bolt head and nut. Again, progress from finger tight, to ratchet tight. Now move to the front subframe. Grab your torque wrench, and set it to 90 ft-lbs. One-by-one, remove a nut, add non-permanent threadlocking compound to the threads, and reinstall the nut. Torque down the nut to 90 ft-lbs. Use your wrench to hold the bolt head steady. You should not turn the bolt head, only the nut. Torquing the bolt itself will give you an inaccurate torque.
Once you have torqued down a complete subframe, immediately check the torque by applying the torque wrench again. You want to do this before the threadlocking compound cures, so move with a purpose. You should not have to deal with re-alignment issues if you kept all the other bolts ratchet-snug through the process. It is a good idea to check these nuts after your first drive. Yes, these nuts and bolts are worth three paragraphs. Don’t be lazy here!
Optional: Loosely re-install rear subframe brace. Heat and crush tube where it meets rear of Exocet floor, drill and bolt through square tube, apply 40ft-lbs maximum torque no matter what bolt you use. This will help with wheel hop and overall handling.