Exocet Build Introduction
Build Guide
Introduction
Welcome to your new Exocet.
The Exomotive Exocet Build Guide covers a wide variety of topics you will find helpful during your Exocet assembly. Be sure to review the Donor Vehicle Information page for helpful resources about your Mazda Miata Exocet donor vehicle.
The US-built Exomotive Exocet is a different beast than the UK Exocet, but the UK Exocet build threads on the MEV Owner’s Forum will still be helpful to review other builds and explore alternative assembly methods. We also recommend interacting with other builders by posting your build on the forum. It is a great place to ask questions, bounce ideas off other Exocet builders, and obtain new perspectives on build tasks.
Due to the variations of Miata donor health and potential previous owner modifications, this guide may not cover every challenge you may encounter during the Miata teardown and build process. Creativity, a resilient nature, and a sense of adventure is recommended. Please feel free to contact us with questions using the Contact links for any questions that come up during the build. If you would like to submit additional assembly methods or parts you found useful during your build, please let us know. We’re always looking to expand this resource for builders to make the assembly process as easy as possible.
Disclaimers
Please don’t skim over this section.
Let’s face it, the end goal of this project is to turn a reasonable, perfectly innocent Miata into something that might be slightly safer than a motorcycle. To take on a project like this, you need to be a certain kind of crazy. We at Exomotive live for this sort of crazy, but there’s no reason to take unnecessary risks in any step of the process.
Let’s get this out of the way right now: if you’re adding forced induction or a V8 swap into the mix, get some driver training. Seriously, we’re past the marketing speech here: a turbo and/or V8 Exocet is seriously, terrifyingly fast. It is faster than most road course racecars. It is faster than your friend’s buddy’s neighbor’s back-halved 600hp Camaro. With just an FMII bolt-on turbo kit and no internal mods, our own XP-3 has the same power-to-weight as a Ferrari Enzo and most liter-bikes. To put that in perspective, that’s like driving a new Mustang GT with 800 hp.1500lbs is crazy-light, and a little power goes a long way. The Exocet is inherently very easy to drive, but the power-to-weight levels of even a turbocharged 1.8 makes driving one of these things a special experience. Some of you are planning 500+hp LSx builds. Please be careful, and understand what you’re getting into.
Your US-built Exocet’s frame and rollover structure were formed by a military contractor with the best diode fiber lasers, high-elongation DOM steel tubing, CNC bend machinery, operators, and tooling available in this country. We take safety very seriously at Exomotive, but even the most well-built safety equipment and rollcage isn’t going to amount for much against a cell-phone-wielding soccer mom in an Excursion. The average Exocet weighs 1000 lbs less than a new Miata. Drive carefully, and adopt a motorcyclist’s mindset (everyone is indeed out to kill you). For those that plan to drive on public roads, a driver awareness/control course, defensive driving, or even a motorcycle training class is a good idea. For the track rats, never skimp on safety gear. Arm restraints are generally not required for most events, but we run them anyways. HANS devices, firesuits, kill switches, fire suppression systems, etc, are all compatible with the Exocet and a very good idea. We want repeat customers!
As far as the build process itself, you’ll be working with dangerous tools, large masses, and possibly old, rusty, tetanus-filled Miata parts. Some believe a big car project requires a blood sacrifice. Others appreciate full use their fingers and toes. While teaching you basic shop safety and proper tool usage is outside the scope of this guide, we would like to caution you to be careful and seek out help when required, especially during the separation of the Miata body and mechanicals. The Miata tub weighs 900-1000 lbs, but it can be handled safely with appropriate respect.
Always use the right tool for the job. Miatas are very easy and thankfully don’t require many expensive specialty tools. That said, be mindful of the forces you are imparting at any given moment, and anticipate where your knuckles might end up when you actually do crack that driveshaft nut. Impact tools and penetrant oil make disassembly a piece of cake, but use hearing and eye protection, especially if you haven’t yet converted to cordless impact tools (which are worth every penny).
Eye protection is REQUIRED whenever you’re dealing with fluids, power tools, rivets, springs, other forms of stored energy, or whenever you’re under your work. Eye protection is highly recommended for the entire build process. It just takes one flake of metal in your eye to ruin your day. Spend the $15 on a nice set of fog-free Z87+ (better than Z87.1) glasses and you’ll wonder why you ever put up with the discomfort of $2 checkout-aisle safety glasses. Prescription lenses are generally NOT impact rated. Solid mechanic’s gloves are good for disassembly, and thick nitriles are good when dealing with fluids and nasty goo (bushing lube, anti-seize, etc).
Important Resources
Communities, Publications, and Parts Providers
http://mevowners.proboards.com/
http://grassrootsmotorsports.com/forum/
Local groups, Google your city or region = “miata” or “MX5”
Since the Exocet’s mechanical bits are straight Miata, just about every mechanical procedure you’d ever want to know about has been covered a dozen times. Here are some good written materials:
Mazda Factory Service Manual for your donor’s year
Miata Performance Projects – By Flyin’ Miata’s Keith Tanner
Mazdaspeed Motorsports Development
http://www.mazdaspeeddevelopment.com/membershipinfo.htm
If you plan to race your Exocet (autocross included), Mazda has some seriously healthy discounts available. Cars built with Mazda parts (read: Exocets) are eligible too; you just need to run Mazda stickers. See “Contingency” for details.
Rosenthal Arlington Mazda
http://parts.arlingtonmazda.com/
Go-to Miata guys for fair prices, quick shipping, and a good website.
Miata-Specialized Suppliers
Flyin’ Miata http://www.flyinmiata.com/
949 Racing http://949racing.com/
Good-Win Racing http://www.good-win-racing.com/
Racing Beat http://www.racingbeat.com/
Planet Miata http://www.planet-miata.com/
General Automotive Suppliers
RockAuto http://www.rockauto.com/ (Google for their latest 5%-off coupon code)
Summit Racing http://www.summitracing.com/ (store is south of ATL for pickup orders)
Pegasus Racing https://www.pegasusautoracing.com/
Recommended Upgrade Path
Start with the basics and go from there.
The most important thing we can stress is that massive weight reduction changes everything. An Exocet is a completely different experience from even a lightweight first gen 1.6 Miata, and your upgrade priorities will change accordingly. Since the Exocet is compatible with many aftermarket go-fast Miata parts out there, it’s very tempting for some builders to go ahead and buy the best Miata upgrade parts out there. While the parts are the same, we wan’t to remind you that you’re not building a Miata. Some things are just not needed, and many things will end up simply too big and heavy, leading to a car that is slower and less fun than it could be.
Moral of the story: working on Miatas is easy. Working on an Exocet is basically cheating. Build your Exocet with your stock Miata parts, then address improvements as you go. Swapping out coilovers, brakes, anti-roll bars, etc, are simple tasks on the Exocet platform.
Recommended Upgrades
- Any service items remaining on the donor that you’re not sure about
- Tires. High performance summer rubber at a minimum.
- For stock power, 195-205 section width is recommended.
- The stock fenders will clear up to 225
- 205-225 for turbo 1.8s
- 225 for race rubber (spec Miata tires work great!)
- 225-255 max for the heaviest V8 builds (1700-1800 lbs)
- Unsprung rotational mass matters a lot with a light car, and you will be able to reach optimal temps/pressures easier with a smaller tire.
- Lightweight wheels.
- Lightweight aftermarket seats
- Your stock Miata seats can work with their sliders, but don’t use them with a harness. Reupholstery kits look nice.
- Slider mechanisms are never going to be as safe as a solid mount.
- Pick a seat that is known to fit in a Miata. The Exocet has a little more room, but not much.
- Seatback braces should only be added if you use appropriate mounting methods. Don’t build a rear-impact impaler.
- Motor Mounts (Mazdaspeed “competition” mounts)
- Shifter rebuild kit (restoring the trademark Mazda rifle-bolt feel)
- 4-bolt big boot not required; get a kit with the tiny plastic cup (ball bushing)
- Planet-Miata will sell you everything you need in one easy to choose package
- Fresh synthetic fluids
- Do research on the best trans fluid for shifting. Miata synchros don’t like GL-5.
- Replacement clutch slave cylinder ( $14 from 949 Racing! )
- Differential Bushings (likely cracked on your donor, will reduce wheel hop)
- Ball joint and tie rod boots (cracked on most donors, inspect and re-pack)
- Wheel bearings (only if you feel play in the hubs or donor is well over 150k)
- 8 new eccentric bolts, especially on 1.6s ( Mazda Part NAY9-28-6AZ )
- Steering wheel with quick-release (not required, but nice)
- We have found the NRG Quick release Gen2 to be a great choice, since it self-aligns the wheel and gives no slop
- A deep-dish wheel and tall hub/quick release helps drivers with longer legs
- We really like the Driven 13.5” deep dish wheel
- Like in a Miata, it’s difficult to read the gauges with a tiny wheel
- Tiny wheels work fine with alternate gauges
- The inevitable loose nut behind the steering wheel (that’s you). Get some training!
Brakes
High performance pads are a good upgrade to improve feel, responsiveness, and fade resistance. Fresh DOT4 fluid is always a good idea. The flavor of pad will be determined by your requirements and who you talk to. Miata brake biases generally are way too front-happy. A bias adjuster will improve feel and overall performance; Flyin’ Miata sells a plug-and-play solution that works nicely. Just be sure that you set the fronts to lock well before the rears. Set the balance with the grippiest tires and surface you’ll run on, as that will induce the most weight transfer and cause the rears to lock easiest. This will make driving on loose or wet surfaces much safer.
No, you really don’t need that $2k massive brake kit. In fact, the little dinky stock 1.6L brakes from a ‘91 Miata can pop the eyeballs from your skull with no fade on track (the guys that run Atlanta Motorsports Park can attest to this). At 1700lbs wet with a big-boned American driver, your stock Miata brakes are going to provide plenty of stopping power for your Exocet without the worry of fade. There are thousands of Spec Miatas (2450lbs) out there running $19 NAPA blank rotors and stock 1.8 calipers. Stock rotors and calipers are fine. HardS or “Sport” brakes have more expensive parts, but look cooler. Cross-drilled rotors are bad and have a chance of cracking. Slots are okay, just make sure that they push “out” as they move through the pad.
So, since stopping power and fade is not a concern, stock brakes are the end-all-be-all, right? Not quite. “Unsprung mass” is very important to a cars handling, response, and outright speed. Also, the wheels and brakes are the furthest point masses from the center of the car, so they contribute greatly to the car’s resistance to rotation (polar moment of inertia, if you want to sound smart).
Basically, reductions in brake mass go a long way to making the car feel better and go faster. Flyin’ Miata’s Four Wheel Little Big Brake Kit (that’s a mouthful) takes away 14 lbs of unsprung mass, which is substantial. Back-to-back comparison with an Exocet with stock cast-iron calipers shows a big difference in handling.
Suspension
Suspension includes a lot of stuff. Let’s take it piece by piece:
Bushings
If your stock rubber bushings look good, your donor has less than 100k miles on it, and are less than 15 years old, they’ll probably be excellent for Exocet duty. Stock rubber suspension bushings will magically feel stiffer, because the loads they see are massively reduced. If they show any signs of cracking, it would be a good idea to replace them.
Polyurethane bushings are the traditional upgrade go-to, but there are some aftermarket upgrade rubber bushings available. Rubber requires near-zero maintenance, and the reduced weight of the Exocet will make upgraded rubber bushings feel even more direct and stiffer. If you don’t want to disassemble your a-arms every 6 months or install grease nipples all over the place, rubber is the way to go. Downside: pressing in rubber will be more involved.
Coilovers
800 lb/in spring rates? Please. Stock NB OEM-replacement coilovers feel amazing and put your ride rates right where you want to be with a car of this nature. Weight reduction is the magic cure-all for performance, feel, and driver feedback. Simple, adjustable dampers will help you extract the performance from your Exocet. Just to be extra biased, Flyin’ Miata’s V-Maxx XXtremes (Sport package) are perfect for the job. Here is a spectrum of recommended rates:
| Use | Front Rate (lb/in) | Rear (lb/in) |
| Comfortable Street | 175 | 115 |
| Hard Street, Autocross | 325 | 225 |
| Road Course w/Wings | 450 | 300 |
These numbers are for Miata-powered Exocets. LSXocets are going to require a bit of tuning and playing around.
Recommended Tools
The Right Stuff to get the Job Done
- Situational Awareness and Preparedness
- Protective Eyewear (Z87.1 minimum, Z87+ recommended)
- Protective Gloves (your SO will thank you)
- Mechanic’s Style (bonus points for Kevlar)
- Thick (9 mils) Nitrile for nasty stuff
- Hearing protection for the loud stuff (impact tools, mainly)
- Appropriate clothing
- Closed toe shoes (bonus for steel toe)
- Standard wrenches (bold means two recommended)
- 8mm (closed)
- 10mm
- 11mm
- 12mm
- 13mm
- 14mm
- 15mm
- 16mm
- 17mm
- 19mm
- Flare nut wrenches
- 8mm
- 10mm
- Ratcheting Wrenches (optional, but nice to have)
- 10mm
- 12mm
- 14mm
- 17mm
- Sockets (both short and long, with appropriate socket wrench) (bonus for impact rated)
- 8mm
- 10mm
- 11mm
- 12mm
- 13mm
- 14mm
- 15mm
- 16mm
- 17mm
- 19mm
- 21mm
- 29mm (front axle nut, only required for fender install)
- 32mm (rear axle nut, only required for fender install)
- We use ⅜” sockets for most everything, but the 19mm and larger sockets should explode less often with ½” sockets. Never use a “cheater bar” on a ratcheting socket wrench, you’ll break the socket wrench. Use a breaker bar.
- Impact Wrench (optional)
- not required, but it will make the job much, much easier
- We use a Dewalt 12V Li-Ion ⅜ drive impact wrench for disassembly. Yes, that little guy usually gets the big suspension and chassis bolts, even on early NAs. Anything requiring more gumption should probably be broken by a breaker bar and penetrant oil.
Phillips and Flathead Screwdrivers. Note that hardware is JIS “Japanese Industry Standard”
- PPF/Tub Splitting Process
- Two-Post Lift
- This is the best option. You can prepare everything beforehand, trailer the roller to a mechanic or friend’s shop, and do the actual separation within 30 minutes. Just be prepared to move the Miata tub afterwards.
- Engine Hoist
- The true grassroots method. All you need is an engine hoist, a load leveler (usually comes with a hoist), and two ~3’ lengths of chain
- Two-Post Lift
- Specialty Tools
- Punch (Spring loaded auto-punches are cheap and work well)
- Rivet Gun
- Fuel Line Quick Disconnect Tool
- For some years
- Auto trim and moulding tool set (if you want to keep your Miata interior plugs reusable)
- Other General Shop Equipment
- Good hand soap (it’s hard to beat GOJO)
- Decent shop rags
- Drain pans and storage containers for fluids. Keep ‘em separate, label, recycle.
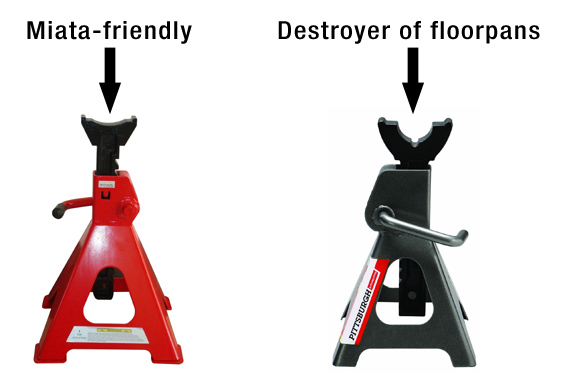
- 4 Jackstands with a shallow curve at the top
- Low-enough profile jack (depending on your height tastes)